Tuesday, 30 April 2013
Character Modeling Progress
Just an update on my character process of the body adjustments and fitting the eyes onto the body. Still a long way away from finished but here an update.
NO IDEA WHAT COLOR
Storyboard Plan
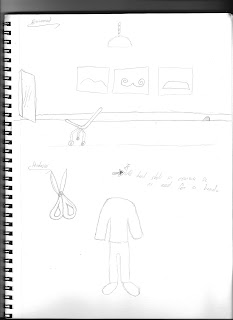
Storyboard plan!
1-
The scene starts off with a Barber
shop and also you can see a hole in the skirting.
2-
Zooms up on the hole in the
skirting.
3-
My character pops out
(introducing character) and looks at the left direction.
4-
This leads to showing the hair
dresser and client cutting hair.
5-
Then zooms up on the hair that
has recently been cut.
6-
Goes back to my character
starring at the wall.
7-
It then shows a picture of a
moustache.
8-
Goes back to my character and
shows an express of interest.
9-
Then my character checks to see
if it is clear to go inspect this object (hair).
10- It’s clear so he pops his legs in and rolls on over towards the
unknown object (hair).
11- He then stops right next to the hair and sniffs it and barges it a
bit.
12- Then close up on face showing an interest expression.
13- Then he experiments by eating the hair.
14- He then starts to grow hair out of himself and a moustache grows on
his face. (Same as picture on the wall.)
15- He rolls on back towards his hole in the skirting.
16- He suddenly stops rolling and his legs pop out to stand.
17- Close up on characters face.
18- He spots another style of moustache on the wall and wants that
style.
19- So he stops more hair on the ground that has been cut.
20- So he decides to roll on back towards the hair.
21- Doesn’t even bother to inspect the hair this time and just gobbles
it up.
22- Close up on character face that has just finished eating the hair.
More hair starts to grow on him, on top of the hair that was already there,
also a new style of moustache.
23- He then likes the taste of the hair and checks to see if the
hairdresser is watching.
24- But she isn’t watching so he keeps on eating the hair with no
hesitation.
25- He then grows more hair on him but he wants more so he checks if
she’s watching once again.
26- But she still isn’t and eats up all of the hair on the ground till
there was none left.
27- Close up on characters face; show the hair being grown out of him.
The hair is too much to handle and keeps growing also, to add to the problems
his moustache keeps changing out of control because there was too much hair
consumed.
28- He now can’t move because of the mass amount of hair he has eating.
He pops is legs in but just drops to the ground and still can’t move.
29- The hair dresser then turns around because she just finished the client’s
haircut and realises she needs to move the hair into the bin. What she doesn’t
realises is that there was my character in there but since he ate too much he
just looks like a hair ball.
30- The hairdresser then goes to pick up the ball of fur.
31- Carries the ball of fur towards the bin.
32- And then with no regret, throws the ball of fur into the bin as if
it was routine.
33- Then the bin will be the closing statement leading to the end of the
animation.
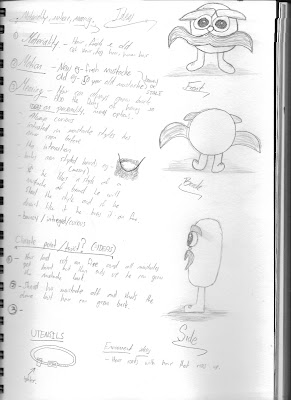
Character personality
Mustachio
This character is inspired by hair (material),
tumbleweed (movement) and a kitten (Meaning). This character lives in a barber
shop in the skirting of the wall. He has his little hole which leads to his
house. We don’t get to see the house, we just see the entrance way. This
character has a personality of interest. He always wants to find new things and
explore them via touch or eating them. When he interacts with a new object he
is curious and very cautious. Once this character likes something (in this case
hair), he will not stop loving it and will always want more. The character
doesn’t know his limits and will always learn the hard way.
Monday, 29 April 2013
Sunday, 28 April 2013
Final video with alarm demo
I have called my project : "The car that ran away"
Link: http://www.youtube.com/watch?v=ZWo5CctgAng&feature=youtu.be
Plus my 3 chosen photos:
Link: http://www.youtube.com/watch?v=ZWo5CctgAng&feature=youtu.be
Plus my 3 chosen photos:
Final adjustments
Here are the final bits in piece for hand in which contains of a PCB and Schematic or my circuit, materials I've used and also a short text on my project :
Added the alarm !
Some of the code for the alarm:
void loop() {
int sensorValue = analogRead(A0);
if (sensorValue > 600) {
analogWrite(3, 100);
delay(1000);
analogWrite(3, 150);
delay(1000);
}
else {
digitalWrite(3, LOW);
}
}
What this is saying is when light is struck upon the LDR (with an intensity of 600+) the alarm will go off but when there is less than 600 the alarm is silent.
The circuit complete with LDR and Alarm:
Adding LDR plus video
Adding the LDR to the circuit. And little video of it working.
Here the Video:
http://www.youtube.com/watch?v=6eGZVsVSDGU
Here the Video:
http://www.youtube.com/watch?v=6eGZVsVSDGU
Saturday, 27 April 2013
Break through finally!
After 7 STRAIGHT HOURS of playing around with different circuits and soldering a lot of wires to control a DC motor with aurdino, I have finally figured out why they haven't been working! I bought 25 dollars worth of AAA batteries and swapped them with my old ones, then plugged in the forward and back wires from the RC Car to the circuit which is connected to aurdino and now I have a complete controlled via a rotary potentiometer. The next step is to now substitute the rotary potentiometer for a LDR (Light dependent resistor, So that every time light is hit on the LDR current will pass through meaning that my RC Car can power up and start to move forward. This is the action I'm trying to complete with my car running away from the light.
Here is an image to help me add a LDR:
Here are a couple of photos of my step by step process.
Adding a battery to the circuit to power the DC motor, also along with that a transistor that can manage the voltage.
Adding the rotary potentiometer to the circuit.
Adding a piezo alarm to the circuit so that when light is struck on the LDR the alarm will go off.
And finally a video of it in action and my fritzing version:
This video is using the rotary potentiometer with the DC motor:
http://www.youtube.com/watch?v=3aafWcPBPjA&feature=youtu.be
This allows me to control the speed of the motor from no speed to high speed.
And fritzing view:
Here is an image to help me add a LDR:
Here are a couple of photos of my step by step process.
Adding a battery to the circuit to power the DC motor, also along with that a transistor that can manage the voltage.
Adding a piezo alarm to the circuit so that when light is struck on the LDR the alarm will go off.
And finally a video of it in action and my fritzing version:
This video is using the rotary potentiometer with the DC motor:
http://www.youtube.com/watch?v=3aafWcPBPjA&feature=youtu.be
This allows me to control the speed of the motor from no speed to high speed.
And fritzing view:
update on back up plan
Thursday, 25 April 2013
PIR no work :( So back up plan here we go!
Since I can seem to work the PIR sensor with the arduino, I'm going to my back up plan which is using a light sensor (LDR) to control the forward motion of the RC Car. When the LDR senses light upon it the car will run away from the light and hide in the darkness. When light has struck the LDR an alarm will go off meaning the something is wrong so it has to run away. (If you understand)
Link: http://www.youtube.com/watch?v=kDhAqh1mLc8&feature=youtu.be
Also I was hoping the PIR I ordered would come before hand in but it hasnt so I have to change my plans up:
Link: http://www.youtube.com/watch?v=kDhAqh1mLc8&feature=youtu.be
Also I was hoping the PIR I ordered would come before hand in but it hasnt so I have to change my plans up:
Tuesday, 23 April 2013
Exploring melody & light sensor
Melody : http://www.youtube.com/watch?v=dwZasBcaBrg&feature=youtu.be
Copied from : http://www.arduino.cc/en/Tutorial/Melody
Sensor: http://www.youtube.com/watch?v=8xV-hgJqBA8&feature=youtu.be
void setup() {
pinMode(13, OUTPUT);
delay(2000);
}
void loop() {
int sensorValue = analogRead(A0);
if (sensorValue > 300) { // Change Light Sensitivity by changing this value.
digitalWrite(13, HIGH);
analogWrite(3, 100);
delay(1000);
analogWrite(3, 150);
delay(1000);
}
else {
digitalWrite(3, LOW);
}
}
Copied from : http://www.arduino.cc/en/Tutorial/Melody
int speakerPin = 9;

int length = 15; // the number of notes
char notes[] = "ccggaagffeeddc "; // a space represents a rest
int beats[] = { 1, 1, 1, 1, 1, 1, 2, 1, 1, 1, 1, 1, 1, 2, 4 };
int tempo = 300;

void playTone(int tone, int duration) {
  for (long i = 0; i < duration * 1000L; i += tone * 2) {
    digitalWrite(speakerPin, HIGH);
    delayMicroseconds(tone);
    digitalWrite(speakerPin, LOW);
    delayMicroseconds(tone);
  }
}

void playNote(char note, int duration) {
  char names[] = { 'c', 'd', 'e', 'f', 'g', 'a', 'b', 'C' };
  int tones[] = { 1915, 1700, 1519, 1432, 1275, 1136, 1014, 956 };

  // play the tone corresponding to the note name
  for (int i = 0; i < 8; i++) {
    if (names[i] == note) {
      playTone(tones[i], duration);
    }
  }
}

void setup() {
  pinMode(speakerPin, OUTPUT);
}

void loop() {
  for (int i = 0; i < length; i++) {
    if (notes[i] == ' ') {
      delay(beats[i] * tempo); // rest
    } else {
      playNote(notes[i], beats[i] * tempo);
    }

    // pause between notes
    delay(tempo / 2);
  }
}
Sensor: http://www.youtube.com/watch?v=8xV-hgJqBA8&feature=youtu.be
void setup() {
pinMode(13, OUTPUT);
delay(2000);
}
void loop() {
int sensorValue = analogRead(A0);
if (sensorValue > 300) { // Change Light Sensitivity by changing this value.
digitalWrite(13, HIGH);
analogWrite(3, 100);
delay(1000);
analogWrite(3, 150);
delay(1000);
}
else {
digitalWrite(3, LOW);
}
}
Thursday, 18 April 2013
How my character will change over time
 And a link to a video of it changing in time:
http://www.youtube.com/watch?v=HkwfIwPIv0U&feature=youtu.be
Tuesday, 16 April 2013
Bought the wrong infrared sensor ! :(
Here is the setup on the arduino and breadboard all I need is the right PIR to fit into the breadboard.
The LED is to make sure the circuit works.
Last steps for project now is to buy a new PIR then put it in breadboard then attach it to my RC Car so when anyone walks in front of the car the alarm will go off meaning get out of its way.
The LED is to make sure the circuit works.
Last steps for project now is to buy a new PIR then put it in breadboard then attach it to my RC Car so when anyone walks in front of the car the alarm will go off meaning get out of its way.
First couple ideas of project two..
This is just the first idea sketch.. Not my decided.
My second sketch(Main Idea):
My second idea is more thought out...
My second idea contains of:
Materiality - Inspiration from a barber shop (hair just cut off)
Movement - Tumbleweed motion (rolling)
Meaning - The meaning of this character inspired by a kitten how they are always curious and wanting to do new things. Also when he wants something he gets it.
The story: The story behind this character starts off with him appearing from the skirting on the bottom of the wall. Then he spots the mustache paintings on the wall. He is inspired by the look and wants one himself. He spots hair which has just been freshly cut falling down onto the floor. An idea pops in his head. He checks to see if its clear then rolls over like a tumbleweed towards the hair, picks it up and eats the hair. The hair explodes out of his body with a slick mustache. He rolls on back towards the skirting of the wall. (Hole). Then he repeats this action because more and more hair keeps falling down and he keeps eating the hair. At the end he has rapidly increased weight. And now when he rolls he goes slower and slower. He eats the last bit of hair on the ground and can't seem to roll back because of the extra weight. The hairdresser sees this ball of fur and looks at it then sweeps it away as if it was the hair the hairdresser just cut.
The environment and movement sketches:
The movement is in a tumbleweed motion (rolling). He pops his legs into himself to roll smoothly.

Monday, 15 April 2013
Development on personalized remote.
This is just to show my progress on my personalized remote and how it was made. This is an influence from Damien Hirst who cuts stuff in half to find out whats inside. I have shown this in my personalized remote as you can see the hardware and soldering that I've done. Also could have spent more time on the looks of the remote and sanded it down a little more to make it look smooth but I want to show this off at the interm presentation coming up. (I call it the 'Sandwich')


Bought some new stuff for ideas
Here I have bought a smoke alarm for the battery and the alarm itself also bought different types of Rc Car to see the difference between my one and others.
I plan to use the battery for my personalized remote control and the alarm with the arduino.
Sunday, 14 April 2013
Tester clip
Here is a tester clip : http://www.youtube.com/watch?v=N1PsNi6FltE&feature=youtu.be
Just uploaded this because I haven't really progressed much because there are so many ideas I've come up with and I need to narrow down my options. I'm think of making a new remote for the R.C which is out of light wood or acrylic. Then attach the metal clips to the base so the circuit is complete. It will be more understandable when you see the physical model.
Just uploaded this because I haven't really progressed much because there are so many ideas I've come up with and I need to narrow down my options. I'm think of making a new remote for the R.C which is out of light wood or acrylic. Then attach the metal clips to the base so the circuit is complete. It will be more understandable when you see the physical model.
Saturday, 13 April 2013
Sketches that I forgot to upload
Subscribe to:
Comments (Atom)


